
How to Turn On Private Browsing on iPhone
Ever searched for a gift on your iPhone… and suddenly those exact products start following you around the internet like a lost puppy? Yeah, we’ve all been there.
Or maybe you just looked something up and thought, “I really don’t want this showing up in my Safari history later.”
Well, you don’t have to leave that digital trail behind, as we will show you how to use Private Browsing on iPhone. You’re still online, but your browsing doesn’t stick around on your device once you’re done.
Let’s break down how to turn on private browsing on iPhone, how it works, and what it actually does (and doesn’t do).
- What is Private Browsing on iPhone?
- How to Enable Private Browsing in Safari on iOS 17
- How to Turn On Private Browsing on iPhone (iOS 16 or Older)
- How to Turn Off Private Browsing in Safari
- What Private Browsing Does and Doesn’t Do (No Confusion Zone)
- Troubleshooting: Private Browsing Missing on iPhone
- How to Browse Privately on iPhone Using Other Browsers
- Advanced Privacy Tips for iPhone Users
- FAQ
- Conclusion
What is Private Browsing on iPhone?
Think of Private Browsing as Safari’s “clean slate” mode.
You open it, do your thing, and once you close it — poof — most of your activity disappears from your phone like it was never there.
When you’re in a private browsing tab, Safari won’t save:
- Your search history
- Pages you visited
- Autofill info you typed in
- Temporary session data
So if someone grabs your phone later, they won’t see what rabbit holes you went down last night at 2 AM.
What Private Browsing really does (and doesn’t do)
| What it DOES | What it DOESN’T do |
| Clears browsing history on your device | Hide you from your ISP |
| Deletes cookies after session | Hide your IP address |
| Stops Safari from saving Autofill data | Make you anonymous online |
| Keeps your browsing local | Stop websites from tracking you |
| Gives you a fresh session | Encrypt all internet traffic |
So yeah, it’s useful — but it’s not magic.
If you want stronger protection, tools like VPNs or tracker blockers come into play. More on that later.

How to Enable Private Browsing in Safari on iOS 17
If your iPhone is running iOS 17, Apple made things pretty smooth. No digging through menus for hours.
Step 1: Open Safari and go to Tab View
Open Safari like you normally would.
Now tap the Tabs icon (bottom right corner). It looks like two squares stacked together — nothing fancy.
You’ll now see all your open tabs laid out.
Step 2: Switch to Private Browsing Mode
Here’s where the magic happens.
Tap the tab group menu at the bottom.
You’ll see options like:
- Start Page
- Tab Groups
- Private
Tap Private.
Then hit the plus (+) button to open a new private tab.
And just like that — you’re in stealth mode.
Safari even changes its look a bit (darker address bar vibes), so you know you’re browsing privately.
No drama. No complicated setup. Just a couple taps and you’re good to go.
Step 3: Lock Private Tabs (Face ID or Passcode)
Now here’s a nice bonus Apple added — locking your private tabs.
Because let’s be honest… sometimes it’s not hackers you need to worry about, it’s friends grabbing your phone like it’s theirs.
To turn it on:
- Go to Settings
- Tap Safari
- Switch on Require Face ID to Unlock Private Browsing
Depending on your iPhone, you’ll use:
- Face ID
- Touch ID
- Or your passcode
So even if someone gets your phone, your private session stays locked down tight.
How to Turn On Private Browsing on iPhone (iOS 16 or Older)
If you’re not on iOS 17 yet, don’t sweat it. The process is still easy.
Step 1: Open Safari and tap Tabs
- Launch Safari.
- Tap the Tabs icon in the bottom right corner.
- This opens your current browsing tabs.
Step 2: Tap Private
- Look for Private in the corner (usually bottom left).
- Tap it.
- Then tap the plus (+) icon to open a new private tab.
- That’s it — you’re now browsing privately.
- You’ll notice Safari looks a bit darker, like it’s switched into “low profile mode.”
How to Turn Off Private Browsing in Safari
Done with your secret mission? Switching back is just as easy.
Here’s how:
- Open Safari
- Tap Tabs
- Select Private
- Switch back to your normal tab group
- Tap Done
And boom — you’re back to regular browsing.
If you want a clean slate, you can also close all private tabs before exiting.
What Private Browsing Does and Doesn’t Do (No Confusion Zone)
Let’s clear the air because this part trips a lot of people up.
Private Browsing is helpful, but it’s not a disguise kit.
Think of it like wiping your footprints off your own floor — not disappearing from the neighborhood.

Simple breakdown
| Helps you with | Doesn’t help with |
| Keeping history off your phone | Hiding your IP address |
| Removing cookies after browsing | Blocking ISP tracking |
| Preventing Autofill storage | Full anonymity online |
| Local privacy control | Encrypting everything |
| Cleaner browsing sessions | Stopping all tracking methods |
Websites can still track you in clever ways like fingerprinting.
Your ISP can still see you’re online.
And ads? Yeah… they still exist unless you block them.
If you want stronger protection, pairing Private Browsing with a VPN is usually the way to go.
Troubleshooting: Private Browsing Missing on iPhone
Can’t find the Private option? Don’t panic — it happens more often than you’d think.
Here’s what might be going on:
| Problem | Fix |
| Screen Time restrictions | Check Content & Privacy settings |
| Safari disabled | Re-enable Safari in settings |
| Old iOS version | Update your iPhone |
| Work/school device rules | Check device management policies |
To double-check:
Go to Settings → Screen Time → Content & Privacy Restrictions
Sometimes, Private Browsing gets turned off like a hidden switch.
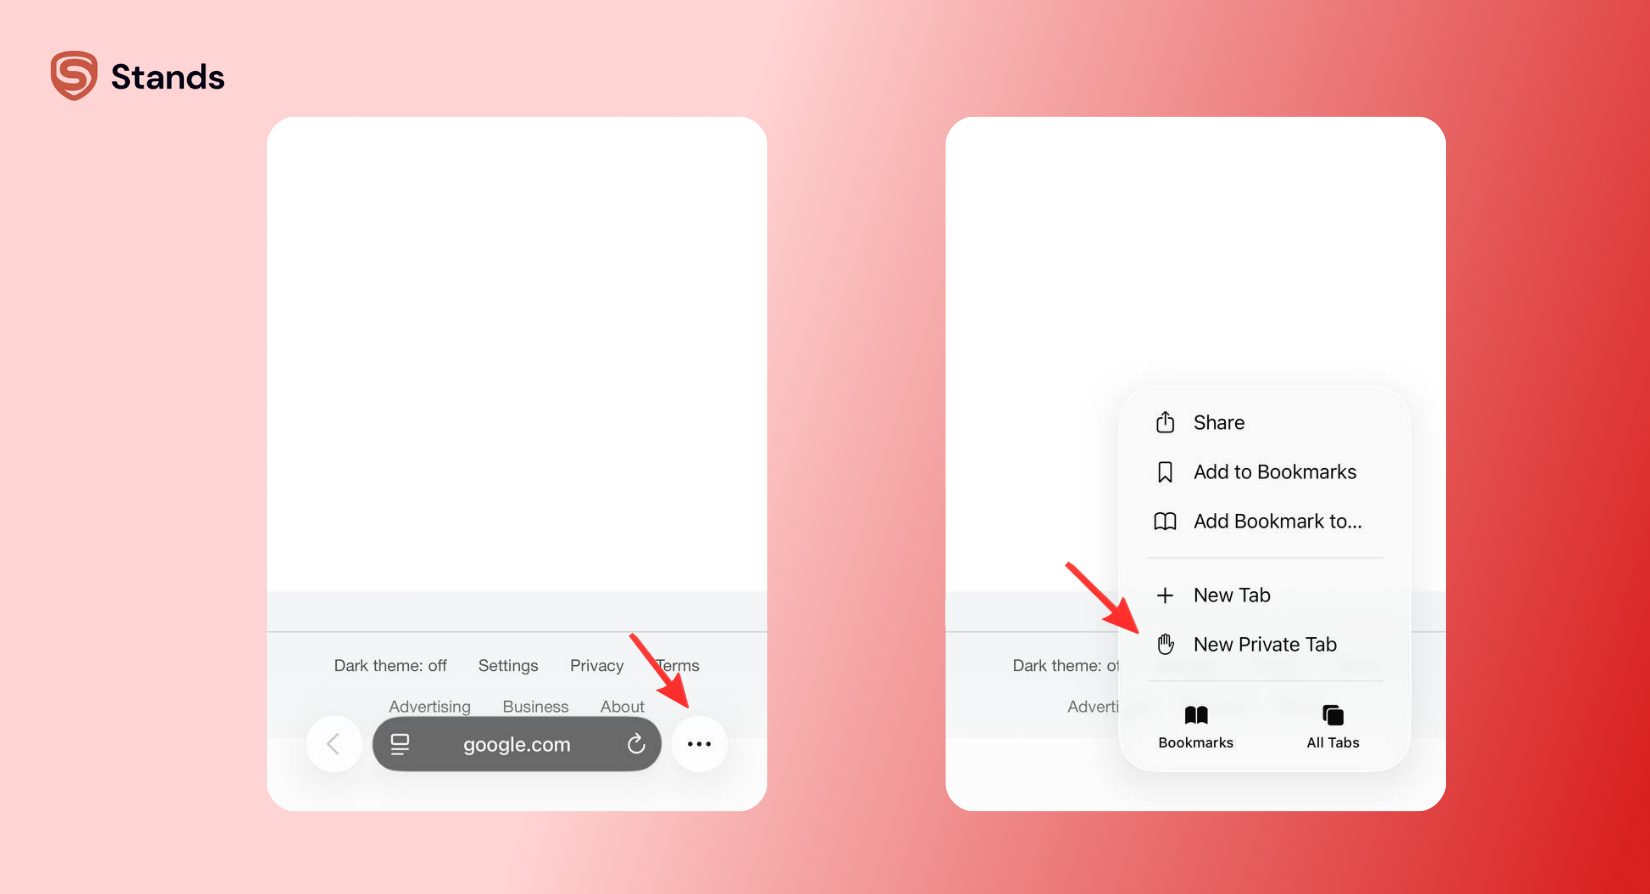
How to Browse Privately on iPhone Using Other Browsers
Safari isn’t your only option — not even close.
If you want more privacy muscle, there are other browsers that do a solid job.
| Browser | What it’s good at |
| Brave Browser | Blocks trackers out of the box |
| Firefox Focus | One-tap clean browsing |
| DuckDuckGo Browser | Privacy-first search + tracking protection |
| Opera | Extra privacy features |
| Safari | Built-in Apple security |
If Safari is your default ride, Brave is like upgrading to a sportier model with extra shields on.
You can also check out tools like Stands AdBlocker to reduce ads and trackers while browsing on your desktop.
And if pop-ups keep getting in your way, this can help too: Pop Up Blocker
Advanced Privacy Tips for iPhone Users
Private Browsing is step one, but if you want to really tighten things up, here’s where things get interesting.
Turn on VPN
A VPN is like putting your internet traffic through a secret tunnel.
It hides your IP address and makes tracking you a lot harder.
Use iCloud Private Relay
If available, Apple’s Private Relay helps scramble your browsing route so websites can’t easily pinpoint you.
Clear your browsing history now and then
Even if you don’t rely on Private Browsing, cleaning house helps.
Go to:
Settings → Safari → Clear History and Website Data
Keep your iPhone updated
Skipping updates is like leaving your front door half open. Updates patch security holes and keep things safe.
Lock your phone properly
Always use:
- Face ID
- Touch ID
- Strong passcode
Because privacy doesn’t matter if someone can just walk in.
FAQ
How do I turn off Private Browsing on iPhone?
Open Safari → tap Tabs → switch back to normal tab group → tap Done. Easy.
Why can’t I see Private Browsing in Safari?
It’s usually Screen Time settings, restrictions, or an outdated iOS version.
Does Private Browsing sync across devices?
Nope. Private tabs stay local — they don’t travel across iCloud.
Can I use Face ID to lock Private tabs?
Yes, on iOS 17 you can lock private tabs with Face ID, Touch ID, or your passcode.
What’s different in iOS 17 Private Browsing?
You get locked private tabs, stronger tracking protection, and better anti-fingerprinting tools.
Conclusion
Learning how to turn on private browsing on iPhone is one of those small tricks that actually comes in handy way more often than you’d think.
It’s perfect for keeping things low-key on your device, whether you’re planning surprises, doing personal research, or just don’t want your browsing history piling up like clutter in a closet.
But don’t get it twisted, as it’s not a one-click invisibility spell. It won’t hide your IP, stop all tracking, or make you vanish from the internet. For better privacy, combine it with smart habits, VPNs, tracker blockers, and up-to-date security settings.
Do that, and you’re not just browsing privately, but you’re browsing smart.
You may also find these privacy resources useful: